There are other articles out there that can give you a basic setup, however this is how I would recommend properly setting up Nextcloud 21 on Debian 10 (Buster).
Why the “properly” qualifier? Well because many of the other articles I’ve read will get you to the point of a working Nextcloud 21 install on Debian Buster – but not one that I would consider what an actual deployment should be.
To confound the problem, Nextcloud’s own documentation might say e.g “you should set up caching services for best performance” but it doesn’t really offer a step-by-step guide on how to do that. How about previews for PDF files and Movies? That’s probably not even something you knew was an option (either because you assumed it would come enabled out of the box, or because you didn’t know it was possible). So we’ll start with the core setup, and finish with the bells and whistles.
Prerequisites
While Nextcloud has published the system requirements on their site – the numbers there are (in my opinion) more geared towards a home setup, with only a handful of people using the service. It’s worth pointing out that they offer enterprise support for a reason – so if you’re approaching this project on behalf of an organization, it may be wise to consider whether or not you might be better served by an enterprise license.
As far as minimum hardware recommendations go, for this setup here’s what I’d recommend:
Host:
- 2 CPU Cores
- 2GB of RAM
- 1 storage device for Debian OS
- 1 separate storage device for Nextcloud data
If you’re planning on setting up Nextcloud to be accessible over the WAN (we will cover that in this article) I would strongly recommend that you have a static public IP AND (if at all possible) a firewall on your network that has a good IDS/IPS system. While the developers for Nextcloud have put a lot into making it secure, you can’t be too careful whenever potentially exposing your personal data to the internet. If resources are limited, you may consider setting up a opnsense or pfsense firewall. Your security is in your own hands.
Initial Setup
Note: This guide is for anyone who wants to DIY. If you would like a complete setup like this but are overwhelmed by the amount of work involved, I’d be more than happy to get you set up for a very reasonable price. More than just that, I’d guarantee my work as well. If you’re interested, send me a message via the contact form here.
For matters of convenience we’ll be running this setup as root – when you’re dealing with this much terminal work, sudo get’s old very quickly. We’ll start with setting up our storage device (in my case, a second hard drive) where we’ll be storing our Nextcloud data.
Setting up Storage
First we’ll create a mountpoint for our second storage device:
mkdir /mnt/storageNext we’ll go ahead and partition our secondary storage device. NOTE! This process will completely erase all the data on the drive. Again, if you’re attempting what’s laid out in this article then you should know how to identify the drive you want to use with fdisk – in my case it is /dev/sdb so:
fdisk /dev/sdb
g # Creates new partition table
n # Creates new partition
w # Writes changes to disk
So now that we have the disk partitioned, we can go ahead and add a filesystem to it:
mkfs.ext4 /dev/sdb1If everything went well, the disk is now ready for use. We’ll continue by creating an fstab entry for it and mounting it.
nano /etc/fstab

# Add the following
/dev/sdb1    /mnt/storage    ext4    defaults    1    2
After saving and closing the fstab file, the storage can be mounted with the mount -a command – you can follow that with the mount command to see what is currently mounted (if everything went well you should see a line that corresponds to the drive we just added).
mount -a
mount

...
/dev/sdb1 on /mnt/storage type ext4 (rw,relatime)
Finally let’s create a directory for our Nextcloud data on the storage we just added and set the proper permissions.
mkdir -p /mnt/storage/nextcloud/data
chown -R www-data:www-data /mnt/storage/nextcloud
chmod -R 755 /mnt/storage/nextcloud
Now we’re ready to install the packages for our base Nextcloud install.
Setting up Dependancies
Back at the terminal:
apt-get install apache2 libapache2-mod-php mariadb-server php-xml php-cli php-cgi php-mysql php-mbstring php-gd php-curl php-zip wget unzip php-intl php-bcmath php-gmpDo you have to use apt-get? No. Why do I use it instead of apt? Well when I started with Debian as a young gecko, the options were apt-get or aptitude – old habits die hard. Moving on, we’ll need to edit our PHP config file to add our timezone:
nano /etc/php/7.3/apache2/php.ini

# Add the following line to set your timezone
date.timezone = Asia/Kolkata
After saving and exiting the file, we’ll need to start up apache and mariadb and set them to autostart on boot.
systemctl start apache2
systemctl enable apache2
systemctl start mariadb
systemctl enable mariadb
At this point we’re ready to create a database for our Nextcloud installation. Let’s start by setting a password for the “root” user in mariadb.
mysql -u root -pAfter setting the root password, we’ll create the database as well as a user for that database.
CREATE DATABASE nextclouddb;
CREATE USER 'nextclouduser'@'localhost' IDENTIFIED BY '[pick a good password];
GRANT ALL ON nextclouddb.* TO 'nextclouduser'@'localhost';
FLUSH PRIVILEGES;
EXIT;
As a technical note, the FLUSH PRIVILEGES command is not actually necessary here as we did all of our work without using INSERT, UPDATE, or DELETE statements. So why add it? It’s a good habit to get into – that’s all.
As our last step in this section, we’ll go ahead and secure our database. Honestly this is something that you should do every time you set up a database.
mysql_secure_installationInstall the Nextcloud Base
Let’s start by grabbing the latest Nextcloud archive from their site. At the time of writing the latest version was 21.0.2:
wget https://download.nextcloud.com/server/releases/nextcloud-21.0.2.zipUnpack that archive to the current working directory:
unzip nextcloud-21.0.2.zipNow we’ll move the extracted files to our webserver directory and set the proper permissions:
mv nextcloud /var/www/
chown -R www-data:www-data /var/www/nextcloud
chmod -R 755 /var/www/nextcloud
After that we will need to add a virtual host file for Nextcloud in apache’s configuration:
nano /etc/apache2/sites-available/nextcloud.conf

# Add the following lines
<VirtualHost *:80>
     ServerAdmin [email protected]
     DocumentRoot /var/www/nextcloud/
     ServerName your.domain.example.com

     <Directory /var/www/nextcloud/>
        Options +FollowSymlinks
        AllowOverride All
        Require all granted
          <IfModule mod_dav.c>
            Dav off
          </IfModule>
        SetEnv HOME /var/www/nextcloud
        SetEnv HTTP_HOME /var/www/nextcloud
     </Directory>

     ErrorLog ${APACHE_LOG_DIR}/error.log
     CustomLog ${APACHE_LOG_DIR}/access.log combined

</VirtualHost>
After saving and closing the file we just created, we can load our new virtual host and some required modules in apache. In the example below I also disabled the default site that ships with apache.
# Disables default site
a2dissite 000-default.conf

# Enables Nextcloud site
a2ensite nextcloud.conf

# Enables the required apache modules
a2enmod rewrite
a2enmod headers
Finally, we’ll need to restart apache to load the changes we’ve made.
service apache2 restartAt this point you should be able to access the WebGUI installer at http://your_server_ip/index.php
Finishing up the Base Install
On accessing the WebGUI you should see some options for finishing the basic setup. A few things of note. First the “Data Folder” should be set to the secondary storage device that we created earlier in this tutorial. Second, when configuring the database connection, remember this should be the username and password of the user we created in the database – not the account that you are running commands from. Finally, there is the option to “Install recommended apps”, and in this tutorial we want that option checked. All things said, your configuration should look something like this:

The installer should run for a bit and then send you to the dashboard.
The Bells and Whistles
At this point we have the basic setup finished, but there is still a bit to be desired. As an example, if you go to Settings > Overview (or http://your_server_ip/index.php/settings/admin/overview) you’ll see something like this:
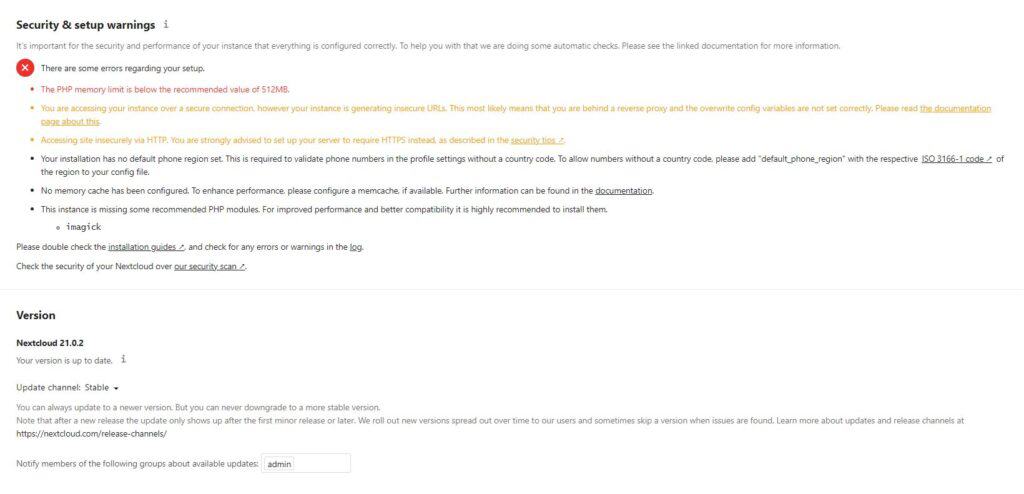
So we’ll clear up those errors as well as tune some things that aren’t even mentioned above. Starting with caching.
Caching for Nextcloud
As per the official documentation, there are a few options when it comes to caching but essentially it boils down to this:
For the best performance you will need two different caching systems.
One of them will cache the PHP code used by Nextcloud, and the other will cache file/database actions.
That said, we’ll start by setting up APCu, which is our PHP cache of choice.
apt-get install php-apcu php-apcu-bcNext you’ll need to edit your php.ini file. We will make some changes to the configuration to avoid issues with the caching system and to tune PHP a bit. This will actually also resolve the “PHP Memory” prompt also).
nano /etc/php/7.3/apache2/php.ini

; Add the following wherever you would like

;;;;;;;;;;;;;;;;;;;;
;     Nextcloud    ;
;;;;;;;;;;;;;;;;;;;;
apc.enable_cli = 1

; Then scroll through the file and modify the following parameters
max_execution_time = 300
memory_limit = 512M
post_max_size = 500M
upload_max_filesize = 500M
After saving and closing your PHP ini file, we’ll need to tell our Nextcloud instance to use the cache. While we are here, we’ll also add our local date time to the config file as this will resolve the “Your installation has no default phone region set.” prompt.
nano /var/www/nextcloud/config/config.php

# Add to the configuration array for caching
'memcache.local' => 'OC\Memcache\APCu',

# Add to the configuration array to set the local date time
'default_phone_region' => 'IN',
After saving and closing that file, you can restart apache and see how the new cache is working. Alternatively, you can just continue on to the next part where we setup our file/database cache.
For our file/database cache we’ll be using redis. In addition to caching, redis also offers transactional file locking – which essentially protects against file corruption. Right out the gate:
apt-get install redis-server php-redisAfter installing those packages and their dependencies we will configure the redis server:
nano /etc/redis/redis.conf

# Modify the following parameters
port 0
unixsocket /var/run/redis/redis-server.sock
unixsocketperm 0770
After saving and closing the file, we’ll need to add the webserver user to the redis server group:
usermod -a -G redis www-dataBack to our nextcloud configuration file, we’ll need to instruct our Nextcloud instance to use the redis service:
nano /var/www/nextcloud/config/config.php

# Add to the configuration array for caching
  'memcache.distributed' => '\OC\Memcache\Redis',
  'redis' => [
      'host'     => '/var/run/redis/redis-server.sock',
      'port'     => 0,
  ],
Finally, we’ll start and enable the redis service to run at boot, and then restart apache:
systemctl start redis-server
systemctl enable redis-server
service apache2 restart
At this point, the caching should be set up and running correctly.
Set up HTTPS
Running anything over the internet in plaintext is a no-no, especially when a proper TLS setup can be done for free. For this we’ll be using certbot, but first, a few things to note.
The method I’m going demonstrate here requires that you have port-forwarding to your server configured correctly for ports 80 and 443 (non-standard ports can’t be used with this method). If you aren’t using a commercial leased line, your ISP most likely filters those ports, so it may come down to calling their support line and asking for them to unblock them. In any case, you must make sure that traffic over those ports can reach your server. It goes without saying that you’ll also need a domain name for your Nextcloud instance. If you proceed with the setup below without ensuring traffic can reach your server correctly, after 5 times of erroring out certbot will block any following requests for 1 hour. Now that’s out of the way, let’s proceed.
apt-get install python-certbot-apacheNow that certbot is installed, you can run the following to request a TLS certificate for your site. At the end of this operation you will have the choice to redirect all HTTP traffic to HTTPS – this is recommended.
certbot --apache -d your.domain.example.comAt this point you should be able to access your Nextcloud instance by it’s domain name (e.g your.domain.example.com). If you do, you will be greeted with this message:
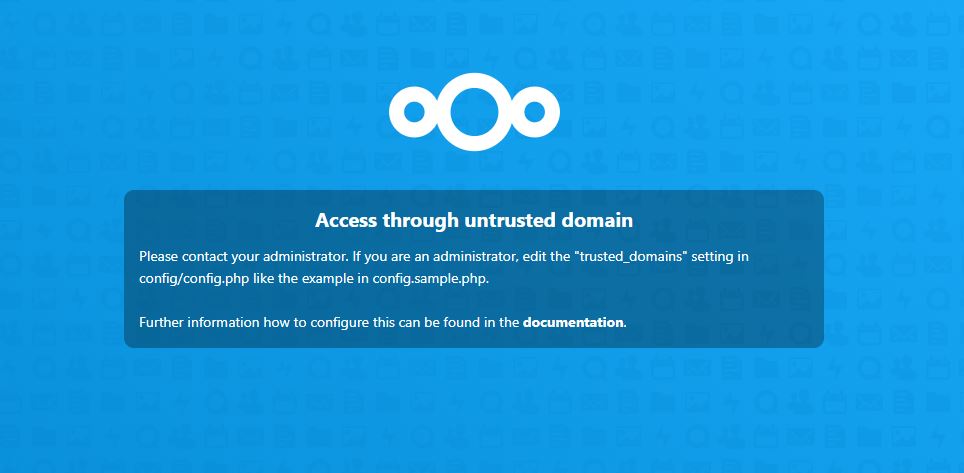
This is normal, as Nextcloud only allows access through domains set in the config.php file. To allow access from your domain name is as simple as:
nano /var/www/nextcloud/config/config.php

# Add your domain in the "trusted_domains" array eg.
'trusted_domains' =>
 array (
    0 => '192.168.1.10', # This is the pre-existing domain for the local network

    1 => 'your.domain.example.com', # This is the line you should add to allow your domain
 ),
After saving and exiting that file, restart apache and you should be able to access your Nextcloud instance by it’s domain name.
To wrap this up, we’ll add a cron entry that will auto-renew our TLS certificate when possible. By default, certbot only offers certificates that are valid for 90 days. Instead of manually logging in to renew the certificate every three months it’s much simpler to simply automate the renewal:
crontab -e

# Add the following
SHELL=/bin/sh
PATH=/usr/local/sbin:/usr/local/bin:/sbin:/bin:/usr/sbin:/usr/bin
0 */12 * * * root certbot -q renew --apache
After saving and closing the crontab, the system will automatically renew your TLS certificate on the 12th of every month when possible.
Tightening Security
Now that we have HTTPS set up, it’s a good idea to leverage some of the security options available. One such options is enabling Strict Transport Security. I won’t go into detail on what that is here, but setting it up is fairly simple.
nano /etc/apache2/sites-available/nextcloud-le-ssl.conf

# Add the following to the very top (before everything else)
<IfModule mod_headers.c>
      Header always set Strict-Transport-Security "max-age=15552000; includeSubDomains"
</IfModule>
Restart apache and Strict Transport Security should be enabled.
Scheduling Tasks with Cron
By default, Nextcloud uses AJAX to run background jobs – it will run one taks with each page loaded. While this works, scheduling with cron is better. So at the command line:
crontab -u www-data -e

# Add the following
*/5  *  *  *  * php -f /var/www/nextcloud/cron.php
After saving and exiting the crontab, you can validate your changes like so:
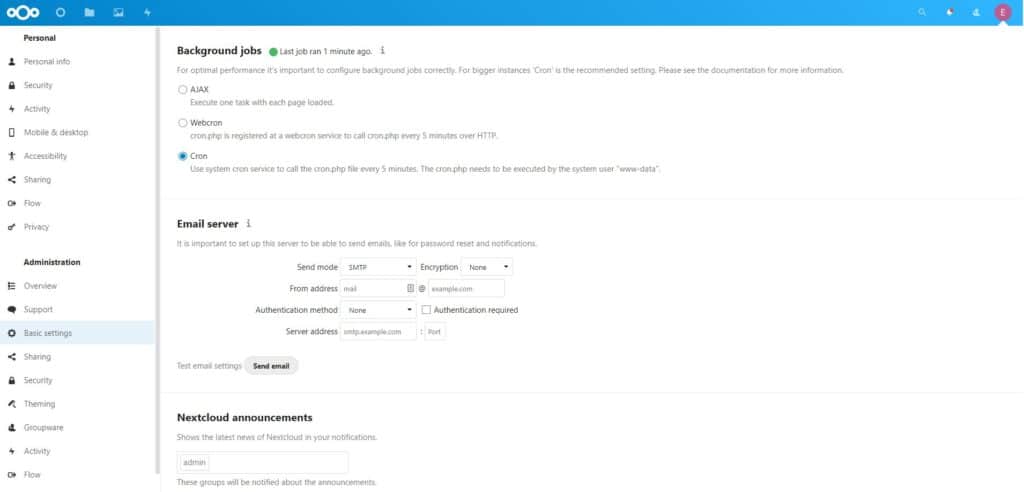
crontab -u www-data -lTo finish enabling cron scheduling, login to your Nextcloud instance and go to User > Settings > Basic settings. There select the “Cron” option.
Thumbnails Pls
By default, Nextcloud won’t generate thumbnails – I mean “previews” (don’t ask me why the redefinition) for many file types – PDFs and movie files being a few. The developer’s reason for this is “Due to security concerns”. After a bit of digging, it turns out the reason for this is based on the fact that previews are generated by PHP libraries written in C, and as such could be vulnerable to attack vectors.
However that isn’t the only consideration – generating previews for movies (for example) can use quite a bit of CPU time. That said, it’s up to you whether or not this is for you. If it is, here’s how to go about setting it up:
apt-get install imagemagick-common ffmpegNext we’ll need to edit our config.php file to add the “preview” functionality:
# Add the following array
'enabledPreviewProviders' =>
 array (
    'OC\Preview\Movie',
    'OC\Preview\PNG',
    'OC\Preview\JPEG',
    'OC\Preview\GIF',
    'OC\Preview\MP3',
    'OC\Preview\MP4',
    'OC\Preview\TXT',
    'OC\Preview\PDF',
 ),
After (you should have seen this coming) restarting apache, previews for the file types listed above should start being generated. If that doesn’t happen, you may need to kick off the preview generation manually:
su - www-data -s /bin/bash -c "/var/www/nextcloud/occ maintenance:mimetype:update-js"
su - www-data -s /bin/bash -c "/var/www/nextcloud/occ maintenance:mimetype:update-db"
Problematic PDF Viewer
At this point, you setup is probably feeling pretty sweet. That is until you go to open a PDF file and get this error:
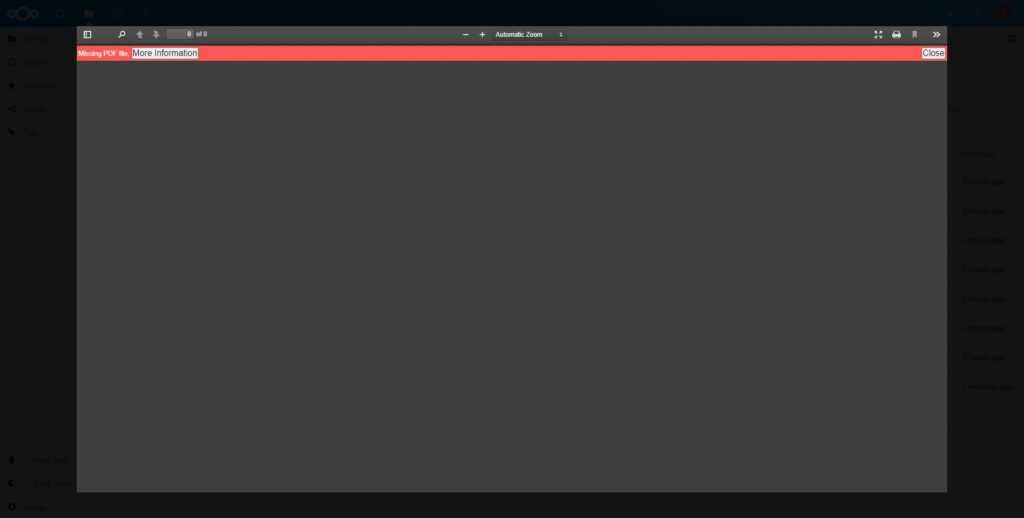
If you don’t have this issue, great! That means the Nextcloud team patched it. However if you did encounter it, the fix is pretty simple, let’s JavaScript:
nano /var/www/nextcloud/apps/files_pdfviewer/js/files_pdfviewer-main.js

# Find the string
!==i[a]&&(c+="/"+encodeURIComponent(i[a]));return t&&(c=i[0]+"//"+i[2]+c),c}}

# Replace that string with
!==i[a]&&(c+="/"+i[a]);return t&&(c=i[0]+"//"+i[2]+c),c}}
Restart apache and clear your browser’s cache and the PDF file viewer should now function properly.
Set up DNS Redirection
If you’re set Nextcloud up as an on-premise/off-premise service (e.g. you have a server running next cloud at an office) then it makes sense to avoid routing on-premise traffic to the Nextcloud instance over the WAN. Essentially, routing local traffic directly to the server saves WAN usage, is more robust (clients will still have access even if the internet goes out), and will be faster (local network speeds instead of WAN speeds). This is pretty simple to set up assuming you are running your own local DNS server. Simply add an A Record to your DNS server with the URL of your server and it’s local IP. For example:
A your.domain.example.com 192.168.1.10At this point your local clients should now seamlessly connect to the local instance – notice the difference in latency. 🙂
Final Notes
After having spent days digging through articles and forums to piece this together, I can honestly say I’m glad to be done with this. That said, hopefully me writing it out here has saved you some time if you’ve decided to undertake this also.
If there’s something regarding a Nextcloud setup that you would like to see here but don’t, just leave me a message in the comments and I’ll add a walkthrough for it to this “Bells and Whistles” section. If you’d like to see some of the other writeups I’ve done, you can find them on my blog page.
Mandatory Plug: If you like seeing content like this maybe consider throwing some BAT at your boy. If you’d like to contribute but want to do it through a different avenue just let me know. Thank you for reading. 🙂

Thank you so much for this!
I’m glad that you found it useful. 🙂